In this post I will guide you through steps required, to install restore portal to separate server. Do note, this is not an official guide or a best practice. Use at your own risk 😊
Assumptions in place:
- You already have a working Veeam Backup for M365 v6 installation in place and it is able to run backups for at least one organization
- There is TCP 9194 port open from portal server to backup server
- Portal server is able to communicate to internet (at least to M365 authentication)
- Organization is configured to use Modern Authentication (Azure AD Application based authentication)
We begin by installing REST API & Restore Portal components to our portal server.
Run setup from Veeam Backup for M365 installation media
Select "REST API & Restore Portal"
And do next -> next -> install -> finish type of installation.
Since we did not do full installation, we won't get GUI or any icons.
So open up a command line, go to your installation folder (by default: C:\Program Files\Veeam\Backup365) and run "Veeam.Archiver.REST.Configurator.exe"
It will open you settings window.
First, we will configure REST API. The HTTPS port we define here (default is 4443) will be the port where your end users will connect to.
Controller host is the Veeam Backup for M365 server, user either IP or FQDN
And install certificate. This can be self-signed or official certificate. This is the certificate used in restore portal, so in production environment, you will want to have a valid certificate.
Next we go to Restore Portal tab
So we now need to enable Restore Portal, and add Application ID used for that. But where to get it? This might not be official way, but it works ->
Go to Veeam Backup for M365 admin console, open Settings and go to Restore Portal tab.
Select tick box "Enable Restore Portal" and click "Create..."
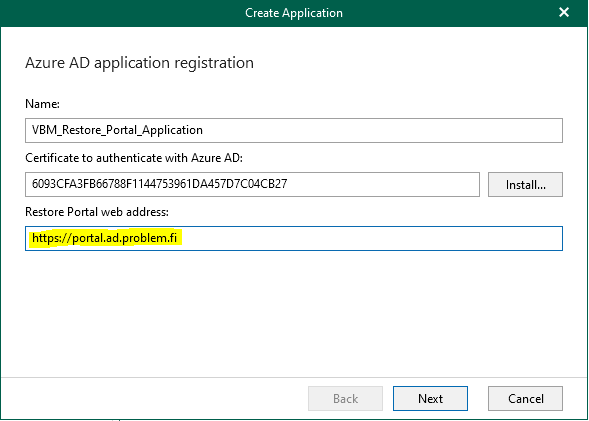
Give name to new Azure AD application that will be created to your M365 organization and click "Install..." to create or install certificate, in my example, I'm using self-signed certificate.
Make sure to add exactly the same address to "Restore Portal web address:" as your end users will be using. So for example, if you use the default port, this must be "https://youradderss.com:4443".
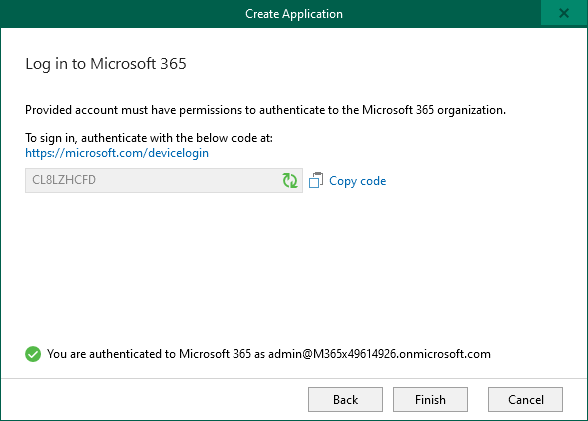
Click next, and you get to authentication
Once authentication is done, click Finish and you return to Options window.
Instead, save that Application ID (in format: xxxxxxxx-xxxx-xxxx-xxxx-xxxxxxxxxxxx)
And click Cancel.
What we just generated, are Azure AD application used by restore portal and certificate that is connected to it. Now we need to transfer this data to our restore portal server.
First open Certificate Manager in you Veeam Backup for M365 server
Right click the certificate we just created and go All Tasks -> Export
Select "Yes, export the private key" and Next..
Default settings should be fine. -> Next
Set some password that you remember.
Give path where you want exported file to go.
Click Finish here to do the actual export, and you should then get "Export successful" window
Click ok
Copy that exported certificate file to your portal server.
Then jump back to our portal server. We should have Restore Portal tab still open.
Click on "Enable Restore Portal" and paste Application ID that you saved previously. Then click "Install..."
Select "Import certificate from a PFX file" -> Next
Select the certificate file that you exported and type in password -> Finish.
Click Apply (or OK)
You can now test if you can get to the login page, open the url of your server
You can even try to log in, but it will fail with error "The server has rejected the client credentials". This is expected behavior, since we are not done with our config yet.
Last thing that we need to configure, is authentication in Veeam Backup for M365. Open management console again -> go to Options -> Authentication tab
Select "Enable restore operator authentication with Microsoft Credentials" and click "Install...". I used self signed certificate here.
Should look similar to this. Click Apply.
Now we need to export this certificate, and import it on portal server.
Open Certificate Manager again
Right click on newly created Certificate and select All Tasks -> Export
We run the export wizard once again (skipping couple of screenshots here).
By default it should say "No, do not export the private key" -> Next
Select "DER encoded binary X.509 (.CER)"
Then you select path for export and finally you have this certificate exported to file.
Copy this file to portal server and open Certificate Manager.
We are importing this certificate to "Trusted Root Certification Authority", so make sure you are under that branch, in Certificates folder, right click -> All Tasks -> Import.
Run the wizard, select your certificate and make sure that it get's imported to correct store:
After you finish importing the certificate, you can go back to your portal login page. If you did everything correctly, your login will be successful and you are able to start restoring your items!
In next
post, I will explain how to add support for more than just one organization in restore portal.