Tuesday, May 3, 2022

Adding additional organizations to Veeam Backup for M365 Self-Service Portal

 As promised in previous post, this time I'm explaining how to add access for additional organizations to Self-Service Portal. Do note, this is not an official guide or a best practice. Use at your own risk 😊

Assumptions in place:

  • You have a working Veeam Backup for M365 environment, with configured Self-Service Portal
  • You have two or more M365 organizations in backups
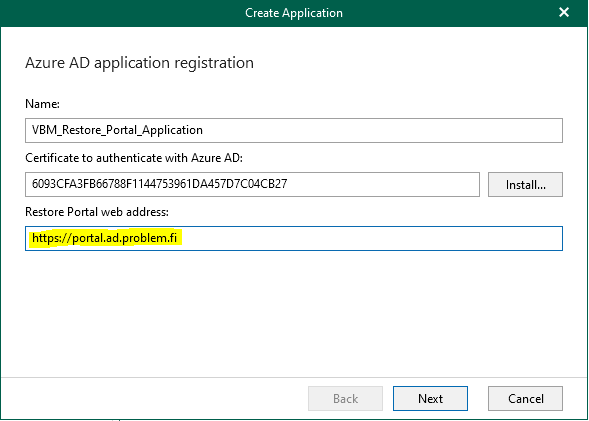
  • You have AzureAD Application ID that you are using with Self-Service Portal (the one you use when you enable Self-Service Portal)

When you have configured first (let's say 'main') organization to work with Self-Service Portal, you can only use that organizations  accounts to log in and do restores. If you try to log in with some other organization configured to Veeam Backup for M365, you will see error message similar to this:


To fix it, we need to add same AzureAD Application ID that is used with Self-Service Portal authentication, to our other organizations AzureAD. 

(This is also described in official documentation: https://helpcenter.veeam.com/docs/vbo365/guide/ssp_configuration.html?ver=60)

To do that, we need PowerShell and AzureAD PowerShell module. Instructions on installing that  PowerShell module can be found here: https://docs.microsoft.com/en-us/powershell/azure/active-directory/install-adv2?view=azureadps-2.0

You also need credentials with enough privileges to add and modify Azure AD Applications in this organization.


Run these commands:
$Credential = Get-Credential
Connect-AzureAD -Credential $Credential
New-AzureADServicePrincipal -AppId "XXXXXXXX-XXXX-XXXX-XXXX-XXXXXXXXXXXX"

After you have done that, log-in to Azure AD and look for that Application. You can search it by name or ID.


Remove "Application type==Enterprise Application" from search filters


Select that Application, in my example "VBM_Restore_Portal_Application"


Go Security/Permission and click on "Grant admin consent for <organization>"

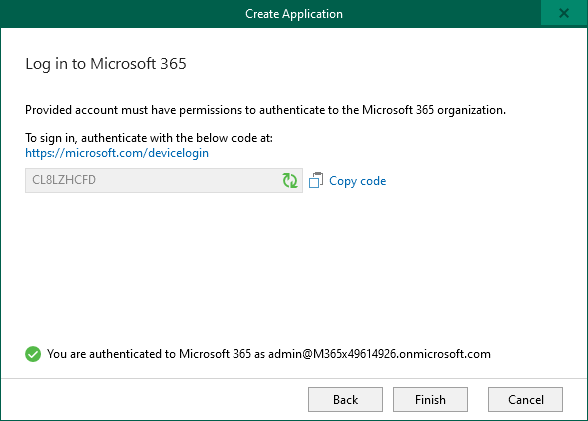
It will require you to re-authenticate and asks you to give required permissions.


Click Accept, and try again. You should be able to login now with your second organizations credentials.

You will have to do this for all organizations that you want to have access to Self-Service Portal


Monday, May 2, 2022

Installing Veeam Backup for M365 restore portal to separate server

In this post I will guide you through steps required, to install restore portal to separate server. Do note, this is not an official guide or a best practice. Use at your own risk 😊

Assumptions in place:

  • You already have a working Veeam Backup for M365 v6 installation in place and it is able to run backups for at least one organization
  • There is TCP 9194 port open from portal server to backup server
  • Portal server is able to communicate to internet (at least to M365 authentication)
  • Organization is configured to use Modern Authentication (Azure AD Application based authentication)

We begin by installing REST API & Restore Portal components to our portal server.


Run setup from Veeam Backup for M365 installation media


Select "REST API & Restore Portal"

And do next -> next -> install -> finish type of installation.


Since we did not do full installation, we won't get GUI or any icons. 


So open up a command line, go to your installation folder (by default: C:\Program Files\Veeam\Backup365) and run "Veeam.Archiver.REST.Configurator.exe"


It will open you settings window. 


First, we will configure REST API. The HTTPS port we define here (default is 4443) will be the port where your end users will connect to.

Controller host is the Veeam Backup for M365 server, user either IP or FQDN

And install certificate. This can be self-signed or official certificate. This is the certificate used in restore portal, so in production environment, you will want to have a valid certificate.

Next we go to Restore Portal tab


So we now need to enable Restore Portal, and add Application ID used for that. But where to get it? This might not be official way, but it works ->

Go to Veeam Backup for M365 admin console, open Settings and go to Restore Portal tab.


Select tick box "Enable Restore Portal" and click "Create..."


Give name to new Azure AD application that will be created to your M365 organization and click "Install..." to create or install certificate, in my example, I'm using self-signed certificate.


Make sure to add exactly the same address to "Restore Portal web address:" as your end users will be using. So for example, if you use the default port, this must be "https://youradderss.com:4443".

Click next, and you get to authentication


Once authentication is done, click Finish and you return to Options window.


Do not click Apply or OK 

Instead, save that Application ID (in format: xxxxxxxx-xxxx-xxxx-xxxx-xxxxxxxxxxxx)

And click Cancel.

What we just generated, are Azure AD application used by restore portal and certificate that is connected to it. Now we need to transfer this data to our restore portal server.

First open Certificate Manager in you Veeam Backup for M365 server


Right click the certificate we just created and go All Tasks -> Export


Click next...


Select "Yes, export the private key" and Next..


Default settings should be fine. -> Next


Set some password that you remember.


Give path where you want exported file to go.


Click Finish here to do the actual export, and you should then get "Export successful" window


Click ok

Copy that exported certificate file to your portal server.

Then jump back to our portal server. We should have Restore Portal tab still open. 


Click on "Enable Restore Portal" and paste Application ID that you saved previously. Then click "Install..."


Select "Import certificate from a PFX file" -> Next


Select the certificate file that you exported and type in password -> Finish.


Click Apply (or OK)

You can now test if you can get to the login page, open the url of your server


You can even try to log in, but it will fail with error "The server has rejected the client credentials". This is expected behavior, since we are not done with our config yet.


Last thing that we need to configure, is authentication in Veeam Backup for M365. Open management console again -> go to Options -> Authentication tab


Select "Enable restore operator authentication with Microsoft Credentials" and click "Install...". I used self signed certificate here.


Should look similar to this. Click Apply.

Now we need to export this certificate, and import it on portal server.

Open Certificate Manager again


Right click on newly created Certificate and select All Tasks -> Export

We run the export wizard once again (skipping couple of screenshots here).


By default it should say "No, do not export the private key" -> Next


Select "DER encoded binary X.509 (.CER)"

Then you select path for export and finally you have this certificate exported to file.

Copy this file to portal server and open Certificate Manager.


We are importing this certificate to "Trusted Root Certification Authority", so make sure you are under that branch, in Certificates folder, right click -> All Tasks -> Import.

Run the wizard, select your certificate and make sure that it get's imported to correct store:


After you finish importing the certificate, you can go back to your portal login page. If you did everything correctly, your login will be successful and you are able to start restoring your items!


In next post, I will explain how to add support for more than just one organization in restore portal.


Tuesday, March 17, 2020

Using Veeam Backup for Microsoft Windows FREE to protect your PC

People around the world are currently working from home, and for many people it's the first time that they have to work from home for extended period of time.

And some of you might wonder, how to take care of backups during this time.

Veeam has a free solution for that, Veeam Agent for Microsoft Windows FREE.

It's exactly the same product as it's commercial versions, Workstation & Server. It just has a bit less features and it only has best effort support. 

Use above link to get your copy, and then let's do install and basic configuration.

In this example, I'm using external USB drive to take backups.

First run installer, it really is a one click install:


After installation is finished, you are asked if you want to setup backups to USB, and we are doing that.

So connect your external drive to your Windows machine and click Next:


You will be asked if you want to change your power plan. You can safely click "No", unless you want to take your backups during night time.


Next you will be asked whether you want to create Bare Metal Recovery media. I'm not covering that part in this blog, but you can find detailed instructions from Veeam documtation

So we skip that part and deselect "Run Veeam Recovery Media creation wizard"


Now we have installed Veeam Backup for Microsoft Windows, and configured it to take backup of whole computer to your external USB drive, at 00:30.

But I want it to take backups when I connect by USB drive to my laptop, so let's change configuration.

First, open GUI -> Go to start and search for Veeam Agent for Microsoft Windows


When GUI opens, it asks you if you want to install license. Answer "No", since we are using this tool in free mode.


Then let's modify our backup job, selcet "Edit Job"

.
You can change name of the job if you want to:


You can choose what you want to backup. By default it's "Entire computer", but in this example we are only taking backup of user files, so I selected "File level backup"


I selected "Personal files", which means everything under users profiles.


My target is Local storage (USB-disk). If you have network share in use, you can also use that (select "Shared folder"), or you can also push your backups to OneDrive


By default, backups go to <driveletter>:\VeeamBackups\. Also by default, 7 days of retention is kept. You can change these settings if you want to, but I'm leaving them to defaults.


I deselected "Daily at", since I don't want to keep my laptop running at night, instead I selected "When backup target is connected", so when I connect my external disk, Veeam automatically runs a backup.


After doing changes, summary page is shown, and you can also select "Run the job when I click Finish", so you can take your first backup right away!


If you want to track progress, you can click "Processing" to see details


And when backup is finished, you see details. For me, I had almost 40GB of data to be backed up, and it took 16 minutes. Does it slow down your laptop so you cannot work while taking backup? No it does not, I actually let that run while writing this blog post.


After backup has been finished, you can detach your USB drive (make sure that it's safely removed)

On a next day, when you reattach that same USB drive, Veeam will automatically do incremental backup. If you want to track progress, you can open Veeam backup for Microsoft Windows GUI again.


Since only few changes had happened since last backup, incremental backup lasted only 2 minutes.


What about file restore?

Connect your USB disk and open GUI. Select "Restore file"


Select restore point where you want to restore your files:


Click open, and wait for new window to open


From this window, you can browse your files and do restores. You can restore to original location by Overwriting existing files, or using Keep, when files are restored with a suffix.

Or you can use "Copy To..." and restore files to different location.


After you have finished restoring files, you can simply close this window.


One good habit for backups could be, to connect your USB drive always when you are having lunch, or maybe at afternoons coffee break? Or last thing before closing computer?

Anyways, take good care of your data!